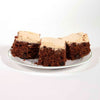
Recipe - Marilyn's Chocolate Zucchini Cake
Here is another recipe from the cookbook that my mother and wife created more than thirty years ago.
This recipe is a family favorite and people cannot tell that there is zucchini in the cake.
Marilyn's Chocolate Zucchini Cake Recipe
1 stick of margarine
1/2 cup of oil
2 eggs
1 3/4 cups of sugar
1 teaspoon vanilla
1/2 cup of buttermilk
2 1/2 cups of flour
1 teaspoon baking soda
1/2 teaspoon salt
1 teaspoon cinnamon
4 heaping tablespoons cocoa
2 cups of shredded zucchini
1/2 cup of chocolate bits
1/2 cup of nuts (optional)
Combine margarine, oil, eggs and sugar. Add vanilla and buttermilk.
Combine flour, baking soda, salt, cinnamon, and cocoa in a sifter.
Sift dry ingredients into wet ingredients. Lastly add zucchini, chocolate bits and nuts to mixture.
Using a 9x13 inch pan, make sure that the pan is well greased and add batter to the pan. Bake at 350 degrees for approximately 45 minutes.
Once the cake is cool, ice with your favorite frosting. In our pictures we added peanut butter frosting.


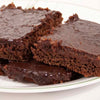
Recipe - Aunt Ruby's Brownies
Thirty years ago my wife and mother created a cookbook for the family that contained some of my mother's favorite recipes that she had accumulated over the years.
My aunt first made these for me more than forty years ago. This recipe is one of my favorites.
Aunt Ruby's Brownies
Brownie batter
- 1/2 cup butter
- 1 cup sugar
- 4 eggs
- 1 teaspoon vanilla
- 1 can chocolate syrup (1 1/2 cups)
- 1 cup sifted flour
- 1/2 teaspoon baking powder
- 1/4 teaspoon salt
- 1/2 cup chopped nuts (optional)
Topping mixture
- 6 tablespoons butter
- 6 tablespoons milk
- 1/2 cup semisweet chocolate chips
- 1 cup sugar
- 1 teaspoon vanilla
Making the brownies
Preheat oven to 350 degrees. Cream together 1/2 cup butter and 1 cup sugar until light and fluffy. Beat in eggs and 1 teaspoon vanilla. Blend well. Stir in chocolate syrup. In a bowl, sift together the flour, baking powder and salt. Stir sifted ingredients into the chocolate mixture. If desired, add walnuts. Pour into a well greased 15 1/2" x 10 1/2" x 1" pan. Bake at 350 degrees for 22 minutes. Check with a toothpick to make sure the center is done. Cool in pan on wire rack.
Making the topping
Combine 6 tablespoons butter, milk, and 1 cup sugar in saucepan. Bring to boil. Boil for 30 seconds. Remove from heat, add chocolate bits and 1 teaspoon of vanilla. Stir thoroughly. Allow the mixture to cool some. You want to still be able to pour it and spread it but if you do it while it's too hot it will only sink into the brownie and not stay on the upper part of the brownie. Spread over brownies. Cut.
Enjoy!

- Kim Dailey
- Tags: Brownies cooking Dailey Grind dailey woodworking foodie Kim Dailey Recipe The Dailey Grind
Whiskey and Bog Oak?
This was originally posted on my other blog - The Dailey Grind
Recently I made eight Katahdin ballpoint pens all from Oak. So what is so special about that, you ask. Well, six of them were made from barrel staves from whiskey barrels. And the other two? Those two were made from ancient bog oak from eastern Europe.

The bog oak wood was carbon dated to be approximately 5,600 years old. Can you imagine the changes that have taken place with our world since those trees sprouted from an acorn?
The other six pens were made from barrel staves that were used in the actual production of whiskey. Two were made from Jim Beam staves, two more were made from Makers Mark bourbon whiskey staves and the last two were made from Jack Daniels staves.
Each of the pens had their own unique smell when I was turning them.
Left to right in the picture above, the Katahdin pens are Jim Beam, Makers Mark, Jack Daniels and the last two are the ancient bog oak pens.
- Kim Dailey
- Tags: ball point pen bog oak Carthage Carthage Maine carthage ME Carthage woodturner Dailey Grind dailey woodworking Dailey Woodworking news katahdin pens Kim Dailey made in maine Maine woodturner MaineMade Oak Pen Pens The Dailey Grind whiskey woodturning Woodturning in Maine Writing Instruments

Custom Bottle Openers
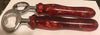
A couple weeks before Father’s Day I was asked to make some custom acrylic handled bottle openers. Not a problem, I can do this and the primary color was to be orange. Once a again not a problem or so I thought.

I decided that a good secondary color would be yellow or gold. So Mary (my lovely wife and assistant) and I got to mixing up the Alumilite. I poured parts A & B and Mary stirred them together. I added orange coloring to the Alumilite and it turned red. Wait red? So I put in more orange coloring and it was still red. More coloring, still red. I added gold flakes to the other clear Alumilite that we had stirred up and that was gold. We were running out of time. We have seven minutes from the time that part A and B start being mixed together until the mixture has to be in the mold and under air pressure or else the urethane acrylic starts to harden and the air bubbles are too big and will leave voids in the acrylic. The air pressure makes the air bubbles so small that they aren’t a problem. I realize that seven minutes sounds like plenty of time but it can get intense especially if things don’t seem to be going quite as planned.
So we are at five and a half minutes and things aren’t looking good. Actually they are looking great but it’s red and not orange. We pour the colors into the mold and mix them together to get some swirls working for us. We just made it under the allotted time and the proof will be once they are turned.

The next day I took the block out from under pressure and, yup, it’s still red and gold. I cut the block up into the 4 blanks that I needed and the block is still showing red and gold but the shavings that were created during the cutting process are orange. Well all right, now things are looking up.
I start to turn the first handle and the handle looks like it’s red and gold but the shavings on the floor, the lathe and me are orange and gold. I get the handle done and polished up and it’s a beautiful red and gold but not orange, unlike my shop. These shavings are clinging to everything. You can see every place that I walked because I am leaving behind a trail of orange shavings.

We show the customer two of the openers to see what she thinks of them, and luckily for us, she loved them. They really are spectacular. The coloring has a lot of depth to it and if you rotate the handles in the light things seem to change and shift.


- Kim Dailey
- Tags: acrylic Carthage Carthage Maine carthage ME Carthage woodturner Dailey Grind dailey woodworking Dailey Woodworking news made in maine maine maine made maine wood turner maine woodturner Maine woodturning maineteam ME micro business My Shop new colors polymer resin small business The Dailey Grind turning acrylic using Alumilite woodturning woodturning in Maine working with Alumilite

May Flowers - Limited Edition Haynes Mill
Meet the limited edition 8 inch Haynes pepper mill made in May Flowers laminated Birch veneer.- Kim Dailey
- Tags: bark edge maple burl bark edge maple burl bowl Carthage Carthage Maine carthage ME Carthage woodturner Dailey Grind dailey woodworking Dailey Woodworking news Kim Dailey laminated birch laminated mills laminated pepper mill laminated wood laminated wood mill laminated wooden mill laminated wooden pepper grinders live edge maple burl made in maine maine maine made maine woodturner Maine woodturning maple maple burl Mills & Spice Grinders My Shop natural edge maple burl pepper grinder pepper mill Salt and Pepper Mills Spice Grinders The Dailey Grind wood turning woodturning woodturning in Maine

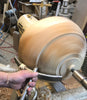
Day 3 and I found a cool app
Jed and I for day three and the app that I used to put together this cool video.- Kim Dailey
- Tags: Birdseye Maple bowl making bowl turning bowl turning class Bowls and Platters CAP2019 Carthage Carthage Maine carthage ME Carthage woodturner craftapprenticeprogram craftapprenticeprogram2019 Dailey Grind dailey woodworking Dailey Woodworking news Figured Maple hand turned wood salad bowl Jed Malcore Kim Dailey Life in general made in maine maine Maine CAP program maine made maine wood bowl maine wood bowl maker maine wood turner maine wooden bowl maine wooden bowl maker maine woodturner Maine woodturning mainecap maineteam making a bowl making a wooden bowl Malcore Woodturning maple maple bowl maple burl maple fruit bowl maple salad bowl ME micro business My Shop nested bowl set nested bowls nested set of bowls nested wood bowls nested wooden bowls salad bowl small business small wood bowl small wooden bowl The Dailey Grind transforming a log turning a bowl turning class turning classes wood wood bowl wood fruit bowl wood salad bowl wood turning wood turning classes wooden bowl wooden bowls wooden fruit bowl wooden salad bowl woodturning woodturning class woodturning classes woodturning in Maine youtube video channel