Custom Bottle Openers
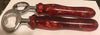
A couple weeks before Father’s Day I was asked to make some custom acrylic handled bottle openers. Not a problem, I can do this and the primary color was to be orange. Once a again not a problem or so I thought.

I decided that a good secondary color would be yellow or gold. So Mary (my lovely wife and assistant) and I got to mixing up the Alumilite. I poured parts A & B and Mary stirred them together. I added orange coloring to the Alumilite and it turned red. Wait red? So I put in more orange coloring and it was still red. More coloring, still red. I added gold flakes to the other clear Alumilite that we had stirred up and that was gold. We were running out of time. We have seven minutes from the time that part A and B start being mixed together until the mixture has to be in the mold and under air pressure or else the urethane acrylic starts to harden and the air bubbles are too big and will leave voids in the acrylic. The air pressure makes the air bubbles so small that they aren’t a problem. I realize that seven minutes sounds like plenty of time but it can get intense especially if things don’t seem to be going quite as planned.
So we are at five and a half minutes and things aren’t looking good. Actually they are looking great but it’s red and not orange. We pour the colors into the mold and mix them together to get some swirls working for us. We just made it under the allotted time and the proof will be once they are turned.

The next day I took the block out from under pressure and, yup, it’s still red and gold. I cut the block up into the 4 blanks that I needed and the block is still showing red and gold but the shavings that were created during the cutting process are orange. Well all right, now things are looking up.
I start to turn the first handle and the handle looks like it’s red and gold but the shavings on the floor, the lathe and me are orange and gold. I get the handle done and polished up and it’s a beautiful red and gold but not orange, unlike my shop. These shavings are clinging to everything. You can see every place that I walked because I am leaving behind a trail of orange shavings.

We show the customer two of the openers to see what she thinks of them, and luckily for us, she loved them. They really are spectacular. The coloring has a lot of depth to it and if you rotate the handles in the light things seem to change and shift.


- Kim Dailey
- Tags: acrylic Carthage Carthage Maine carthage ME Carthage woodturner Dailey Grind dailey woodworking Dailey Woodworking news made in maine maine maine made maine wood turner maine woodturner Maine woodturning maineteam ME micro business My Shop new colors polymer resin small business The Dailey Grind turning acrylic using Alumilite woodturning woodturning in Maine working with Alumilite

Day 3 and I found a cool app
Jed and I for day three and the app that I used to put together this cool video.- Kim Dailey
- Tags: Birdseye Maple bowl making bowl turning bowl turning class Bowls and Platters CAP2019 Carthage Carthage Maine carthage ME Carthage woodturner craftapprenticeprogram craftapprenticeprogram2019 Dailey Grind dailey woodworking Dailey Woodworking news Figured Maple hand turned wood salad bowl Jed Malcore Kim Dailey Life in general made in maine maine Maine CAP program maine made maine wood bowl maine wood bowl maker maine wood turner maine wooden bowl maine wooden bowl maker maine woodturner Maine woodturning mainecap maineteam making a bowl making a wooden bowl Malcore Woodturning maple maple bowl maple burl maple fruit bowl maple salad bowl ME micro business My Shop nested bowl set nested bowls nested set of bowls nested wood bowls nested wooden bowls salad bowl small business small wood bowl small wooden bowl The Dailey Grind transforming a log turning a bowl turning class turning classes wood wood bowl wood fruit bowl wood salad bowl wood turning wood turning classes wooden bowl wooden bowls wooden fruit bowl wooden salad bowl woodturning woodturning class woodturning classes woodturning in Maine youtube video channel

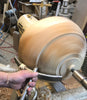
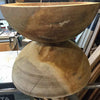
The tale of two bowls
This morning I checked on some roughed out bowls that I had set aside to dry.- Kim Dailey
- Tags: blister maple bowl blister maple wood bowl blister maple wooden bowl bowl making bowl turning Bowls and Platters Carthage Carthage Maine carthage ME Carthage woodturner carved wood curly maple curly maple salad bowl curly maple wood bowl curly maple wooden bowl dailey woodworking etsy maine team Figured Maple fruit bowl hand turned wood salad bowl Kim Dailey Life in general made in maine maine maine made maine wood bowl maine wood bowl maker maine wood turner maine wooden bowl maine wooden bowl maker maine woodturner Maine woodturning maineteam making a bowl making a wooden bowl maple maple bowl maple salad bowl ME My Shop nested bowl set nested bowls nested set of bowls nested wood bowls nested wooden bowls salad bowl small business spalted maple spalted maple salad bowl spalted maple wood bowl spalted maple wooden bowl spalted maple wooden salad bowl spalted wood The Dailey Grind transforming a log turning a bowl wood bowl wood salad bowl wood turning wooden bowl wooden bowls wooden salad bowl woodturning woodturning in Maine

Recent experiments
Recently I've been experimenting more with stabilizing wood and also with dying wood during the stabilizing process. So far I've stabilized the following woods: Birdseye Maple, Box Elder Burl, Cherry Burl, Curly Maple, Maple Burl and Redwood Burl. I've dyed and stabilized the following woods: Box Elder Burl with the color blue and Curly Maple with the color green.
Stabilizing is a process where as much moisture is cooked out of the wood as possible and then the wood is put in to a vacuum chamber with resin. The vacuum pulls the air in the wood out of the wood and replaces it with the resin. If I want to add color to the wood I just mix the resin with a dye and then do the process of putting the wood into the vacuum chamber with the dyed resin. The wood is generally under vacuum for an hour or more and then left to soak in the resin (or resin and dye) for hours or sometimes a day or more. Once this part is done, I then take the wood out of the chamber and wrap the pieces in aluminum foil and put them in to the oven to cook the wood again. Don't worry, I have a separate toaster oven that I do this in and I don't use our kitchen oven for this process. After allowing the wood to cool sufficiently, I take off the foil and I'm ready to start the turning process with the stabilized wood.

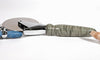
From left to right in the picture above
Dyed Green Box Elder Burl t-handle bottle stopper and corkscrew combination
Dyed Blue Box Elder Burl t-handle bottle stopper and corkscrew combination
Dyed Green Curly Maple handle on the pizza cutter
Stabilized Birdseye Maple t-handle bottle stopper and corkscrew combination
- Kim Dailey
- Tags: Birdseye Maple blue Bottle Stoppers burl Carthage Carthage Maine carthage ME Carthage woodturner carved wood carving wood cherry burl cork stoppers curly maple Dailey Grind dailey woodworking Dailey Woodworking news dyed dyed blue dyed green dying and stabilizing wood dying wood Figured Maple green Kim Dailey Life in general made in maine maine maine made maine wood turner maine woodcarvers maine woodturner Maine woodturning maple maple burl My Shop pen turning pizza cuttah pizza cutter Pizza Cutters - Pizza Wheels pizza wheel stabilized wood stabilizing wood stoppers The Dailey Grind wood wood carving wood carving in maine wood turning woodcarving woodturning woodturning in Maine